Wednesday, August 27, 2014

Cookie Dough Ice Cream


It all started when I bought David Lebovitz's ice cream cook book, The Perfect Scoop, and this summer has become an ice cream making extravaganza.  I am a huge fan of his and all of his recipes are fantastic.  If you don't have the book, you should definitely buy it.  This recipe is probably one of my favorites.  It was inspired from his cook book but the recipe has been changed for gluten free purposes.  When I was little, cookie dough ice cream was one of my favorite flavors.  Mason has never had cookie dough ice cream before and it made me so happy that I could make it for him!  I really try to limit sugar intake and promote healthy eating.  In fact, I'm sure Mason and Gabby are really tired of me constantly pushing fruits and veggies on them, but it's a Mom requirement and something I'll probably always do;)
For a special treat, this ice cream is incredible and it's something I can give Mason that he can't normally have. And it's homemade, which is even better!  I buy organic, good quality milk which only enhances the flavor. Also, ice cream makers aren't particularly expensive.  Williams Sonoma has one for about $70 and you can probably find one for about $50.  So, even though summer is almost over, I'm still going to be making delicious ice cream all year long!


Cookie dough mixed in the bowl.


Press the cookie dough into a flat disk and place in plastic wrap.  Refrigerate for a least an hour.  


Ice cream base thickening after the yolks have been added.  It should be added to coat a spoon.


Mason enjoying cookie dough ice cream after running around in the yard!

La Recette:

Ingredients-
Ice cream-
1 cup whole milk
2 cups heavy cream
3/4 cup granulated sugar
6 egg yoks
1 teaspoon vanilla extract - I like the Nielsen-Massey brand.  It's certified GF and kosher.  
Pinch kosher salt

Cookie dough-
6 tablespoons unsalted butter, melted
1/4 cup rice flour* - I like Bob's Red Mill
1/4 cup plus 2 tablespoons light brown sugar 
1/2 cup of mini chocolate chips - I like the Enjoy Life brand
1/2 teaspoon of vanilla extract
1/4 teaspoon kosher salt

Supplies-
Ice Cream maker
Medium sauce pan
Wooden spoon
Mixing spoon
Whisk
Strainer
2 large bowls
1 medium bowl
Plastic wrap
Measuring cups and spoons

Directions-
-In a medium saucepan, combine the whole milk, 1 cup of heavy cream, sugar and salt.  On medium high heat and stirring frequently, heat mixture until just before a boil.  Turn the heat off and set aside.  Let it sit for about 10 minutes.  
-In the meantime, put the other cup of cream and the teaspoon of vanilla in a large bowl, and put a strainer on top.  Set aside. 
-Next, put the eggs yolks into one of the large bowls.  Whisk the egg yolks together until well combined.  Whisking continuously, pour the cream mixture into the eggs and mix well.  
-Pour the egg/cream mixture back into the saucepan and over medium-high heat, stir continuously until the mixture thickens, 5-7 minutes.  You want to make sure that you stir the mixture the whole time so the eggs don't cook.   It will coat the back of the wooden spoon and appear thicker.  
-Pour the mixture through the strainer and into the bowl with the other cup of heavy cream.  Mix a few times to make sure it is combined.
-Place in the refrigerator and chill for a least two hours.
-Next, in a medium bowl, combine the rice flour, brown sugar, mini chocolate chips, and salt.  Mix well.  Making sure the butter is a room temperature, pour the butter into the mixture and then add the vanilla.  Mix well.
-Pour the dough onto plastic wrap and form into a flat disk.  Wrap it up and refrigerate for a least an hour.  Remove from the fridge about 15 minutes before you plan on using it.
-Pour the chilled ice cream base into the cold cylinder and follow the instructions for your ice cream maker.  It usually takes between 15-20 minutes.  The ice cream will look like soft serve when it is done.  
-While the ice cream is mixing, take the disk of cookie dough and break off about 1/2 teaspoon size pieces and roll into small balls.  
-When the ice cream is done, gently fold in the cookie dough balls.
-Spoon the ice cream into a freezer container (Sur la Table sells great ice cream containers) and freeze for at least three hours or preferably over night.  
-Enjoy!

 -Makes 1 quart.
*My general rule is that if it's 3/4 cup or under I just use plain rice flour without making my gf flour blend.  If you don't need gluten free, all purpose flour can be used.  

Thursday, August 14, 2014

Peach Galette


This galette is such a fantastic summer dessert.  It's so versatile.  You can use plums or any other kind of berries you like.  In the Fall, I love to make apple galettes.  A galette is essentially a free form tart.  I love it because it's not time consuming but I always feel like I accomplished something when I'm done.  They look so beautiful and you really get to work with the dough.  This particular crust is very light, buttery and flaky.  You would never know that it's gluten free - ever.  Peaches are in peak season, so they taste extra sweet and delicious.  Mason and Gabby have really been eating a lot of peaches this summer, so this dessert really hits the spot.  Add a little homemade whipped cream (see kitchen tips) or vanilla ice cream and you have a great treat to enjoy outside after dinner before the fireflies come out!      


Ready to cut!


Shape the dough into a 6 - inch round.  Place in plastic wrap and refrigerate for 30-60 minutes until dough has chilled.  It can keep in the fridge for one day.


Roll the dough out in-between two pieces of parchment paper. 


Roll the dough out to just about a 12 - inch round.


Arrange the peaches in a circular pattern and brush the edges with heavy cream.


Enjoy!

La Recette:

Ingredients-
Crust-
1 1/2 cups gluten free baking mix (or if you don't need GF, all purpose flour works too)
2 tablespoons granulated sugar
1/2 teaspoon kosher salt
6 tablespoons unsalted butter*, cut into small pieces
1/4-1/2 cup ice water
Filling-
5 ripe peaches, halved, pitted and sliced 1/8-1/4 inch thick
1/3 cup light brown sugar
2 tablespoons corn starch
1 teaspoon pure vanilla extract
1/2 teaspoon cinnamon
1 tablespoon heavy cream
1 tablespoon granulated sugar
Topping-
1 cup heavy whipping cream
1/4 cup granulated sugar

Supplies-
Food processor, Vitamix, or blender (if you don't have any of these, you can do it by hand)
Rolling pin
Baking sheet
Parchment paper
Paring knife
Medium size bowl
Measuring cups and spoons
Pastry brush
Balloon whisk or hand mixer for whipped cream

Directions-
-In a food processor, pulse the gluten free baking mix, 2 tablespoons of sugar, and salt until combined.  Add the butter and pulse until the dough looks like coarse meal.  With the motor running, slowly add in the water until the dough starts to come together.  Transfer the dough to plastic wrap and press to a 6 inch round disk. -Cover the dough completely and place in the refrigerator for  30-60 minutes.
-In the meantime, preheat the oven to 425 degrees.  In a medium bowl, add the peaches, brown sugar, vanilla, cinnamon, and corn starch.  Mix well until all ingredients are combined.  The mixture will be very juicy.  Set aside.  
-Have a baking sheet ready and place two sheets of parchment paper on the counter.  Both sheets of parchment should be at least 20 inches long.  
- Remove the dough from the refrigerator and place it in the middle of the parchment paper.  Remove the plastic wrap let it sit for 3-4 minutes.  Place the other sheet of parchment paper on top.
-Using your rolling pin, starting from the center and working out, quickly roll the dough to a 12 - inch round.  Gluten free dough has a tendency to crack.  If this happens, just push the cracks together.  Once you have about 12 inches, remove the top parchment and transfer the dough with the parchment paper to the baking sheet.  Just pick the parchment and dough up together.
-Leaving an inch border around the edge, take the peaches from the bowl, one by one, and arrange them in a circular pattern.  You will have a lot of left over juices.  Drizzle 2 tablespoons of the juice over the peaches.
-Gently roll/fold the dough up to the edge of the peaches and place the galette in the refrigerator for about 20 minutes until chilled.  (If the gluten free dough becomes to soft, you may have to refrigerate the galette for 15 minutes before folding the edges.)
-Brush the dough with a tablespoon of the cream and sprinkle the dough with a tablespoon of granulated sugar.
-Place on the middle rack of your oven, and bake for 40 minutes or until golden brown.
-Let the galette cool for 15-20 minutes.  Serve warm or room temperature and with whipped cream, ice cream or as is.

-Serves 8
*If you need dairy free, replace the butter with Earth Balance sticks and don't use heavy cream for brushing the dough.  Instead of using cream, you can brush the dough with the extra juice from the peaches.  This recipe is naturally egg free and can easily be made dairy free.  

Saturday, August 9, 2014

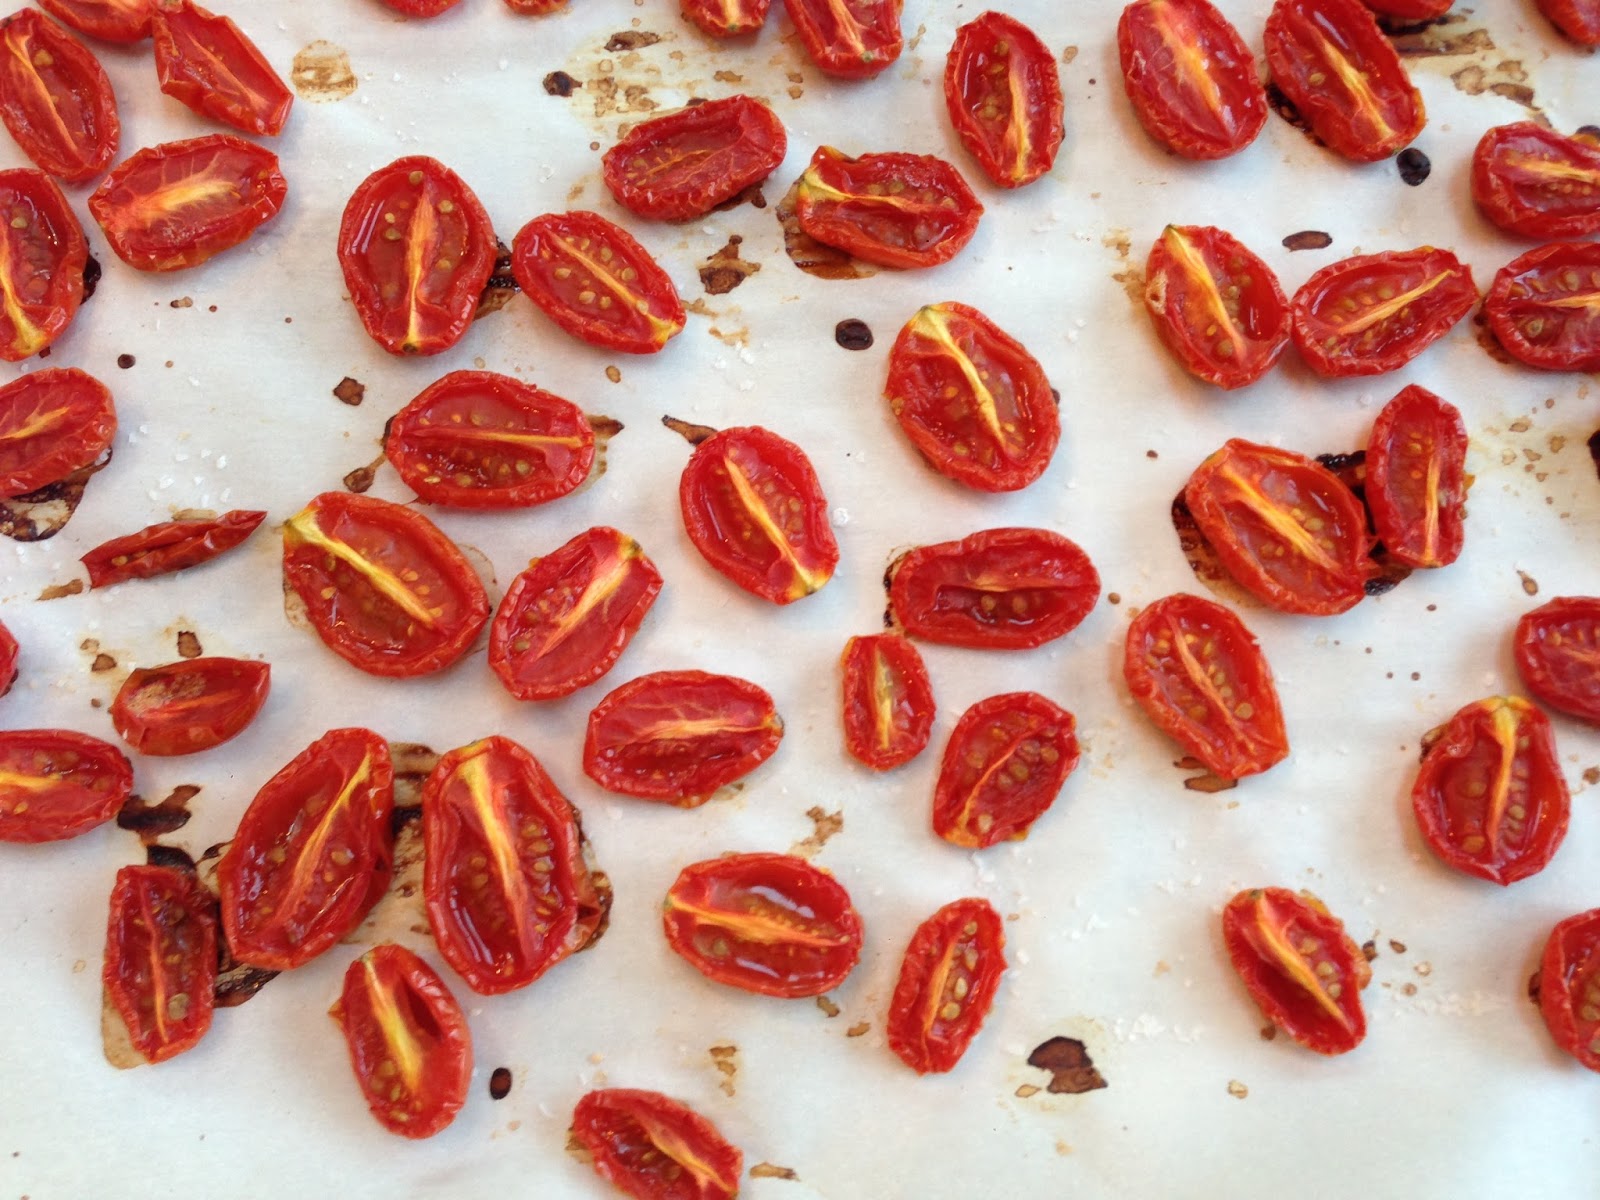
Quick Pasta with Basil, Roasted Tomatoes and Parmesan


My good friend Emily sent me a text a few weeks ago and asked for an easy dinner option for her family.  I use this recipe all of the time, and I don't know why I've never posted it.  It's a family favorite and it's probably the quickest dinner you'll ever make.   It's a summer meal that really hits the spot.  My kids love it, but they tend to pick around the tomatoes.  I hope that eventually they will start to love them like I do ;)  I personally think the tomatoes for this dish are so good that I save any leftovers to munch on throughout the day.  They are sweet and salty and super juicy.  Another bonus is because this meal requires so few ingredients that there is very little clean up.  Enjoy this easy breezy pasta dish!


Roasted tomatoes are my favorite!

La Recette:

Ingredients-
1 lb. gluten free pasta of choice - Penne, Rigatoni, or Spaghetti work well (if you don't need GF regular pasta will work too)
1 pint grape tomatoes, sliced in half
2 cloves garlic, finely minced
1/2 cup parmesan cheese, plus extra for garnish
1/4 basil, finely chopped
2 tablespoons Extra Virgin Olive Oil
1 1/4 teaspoon kosher salt
1/2 teaspoon freshly ground black pepper
1/4 teaspoon red pepper flakes, optional

Supplies-
Large Sauce pan
Slotted spoon
Baking sheet
Parchment paper
Colindar
Chef's knife
Measuring cups and spoons
Cutting board
Grater

Directions-
-Pre-heat oven to 400 degrees
-Line a baking sheet with parchment paper and spread the sliced tomatoes out evenly, sprinkle with salt and place in the oven for 20 minutes.  After 20 minutes, remove from the oven and set aside.  This step can be done in advance.  Tomatoes can be kept in the refrigerator for a week.  
-In the meantime, bring a large pot of water to boil.  As soon as you have a rolling boil, sprinkle in 2 teaspoons of salt and a tablespoon of extra virgin olive oil.
-Cook the pasta to al dente, mixing frequently (especially with GF pasta).  *Make sure to reserve 1/2 cup of the pasta water before you drain it.  
-While the pasta is cooking, grate the cheese and chop the basil.
-Drain the pasta and put it back into the sauce pan.  Add in the garlic and tomatoes while the pasta is still hot.  Wait five minutes and add in the basil and cheese.  Mix well.
-Next, add in the Extra Virgin Olive Oil, reserved pasta water, kosher salt, pepper, and pepper flakes if desired.  Mix well, making sure everything is combined.  
-Garnish with extra Parmesan, serve warm and enjoy!

-Serves 4 adults


Saturday, August 2, 2014

Seafood Salad


This salad is probably one of my favorite dinners to make in the summer.   Paired with a mojito or a  rosé wine, it's fabulous.  It's light, healthy and so refreshing.  It's perfect after a day at the beach or the pool.  The sweet, crisp shrimp and champagne vinegar are a delicious combination.  I'll admit that it's not the quickest recipe.  There is a lot of chopping involved but it's completely worth it.  I like to get my mise en place set up the night before, meaning that I chop everything ahead of time, and then cook the shrimp the day I am serving the recipe.  That way the only thing I have to do is mix everything up!  And, my kids it eat!  That's the best part for me.  My kids have trouble with green vegetables but they are good seafood eaters.  Up until now, they wouldn't eat crab readily, but I told them after the fact and they both enjoyed it.  Try this recipe as soon as possible and I hope everyone enjoys their last month of summer!


Chopped and ready to mix.


I really like this rosé and it was delicious with the salad.


Dig in!

La Recette:

Ingredients-
1 lb. shrimp (31-40 count) peeled and deveined*, tails on
1 lb. bluefin jumbo lump crab meat, picked through for shells
3-4 cups baby arugula (or another green that is similar - I happen to love arugula)
1/2 cup cornichons, finely chopped (cornichons are pickles made from tiny cucumbers - Trader Joe's are great)
1/2 cup pitted green spanish olives, finely chopped
1/2 cup red onion, finely chopped
2 celery stalks, finely chopped
1 red bell pepper, roasted and roughly chopped**
1/4 cup flat leaf parsley, roughly chopped
2 tablespoons capers, rinsed and drained
2 tablespoons jalepeños, finely chopped, seeds and stems removed
1/4 cup extra virgin olive oil
Scant 1/4 cup champagne vinegar
1 1/4 teaspoons kosher salt
1/2 teaspoon freshly ground black pepper
Juice of 1 lemon (squeezed on the salad right before serving)

Supplies- 
Cutting Board
Chef's knife
Baking sheet
Aluminum foil
Small colander (for the capers)
Measuring cups
Measuring spoons
Large mixing spoon
1 large mixing bowl
1 small mixing bowl
Balloon whisk
Large serving platter

Directions-
-Preheat the oven to 400 degrees.
-Line a baking sheet with aluminum foil and place the shrimp on the sheet in a single layer.  Drizzle with extra virgin olive oil, and sprinkle with kosher salt and pepper.
-Bake for 7-8 minutes until light pink.  Remove from the oven and remove the shrimp immediately from the baking sheet.  I usually lift the aluminum foil off of the baking sheet and carefully transfer it to the counter top.  This way the shrimp won't overcook.  Let the shrimp come to room temperature.
-Combine all of the chopped ingredients, cornichons, olives, red onion, celery, red pepper, parsley, jalepeños, and capers into a large bowl.  I have to quickly sauté the onions and celery.  My husband, Jake, can't eat raw celery so I sauté it for 3-4 minutes.  I add in the red onion just to take the bite out.  It's still crunchy and the colors are still vibrant.  If you don't have this situation, it's not necessary.
-When the shrimp is cool add it into the large bowl as well.
-Add in the crab meat and mix everything really well.  You want to see all of the colors evenly distributed in the salad.
-In a small bowl, whisk the extra virgin olive oil,  champagne vinegar, salt and pepper together.
-Pour it over the salad and mix again really well.
-Cover and refrigerate for at least 20 minutes to let all of the flavors come together.
-After 20 minutes, remove the salad from the fridge and cut the lemon in half.  Squeeze the lemon juice on top, catching any seeds.
-You can use a large serving platter or plate individually.  If you plate individually, divide the greens up evenly onto each plate.  If you choose to use a large serving platter, arrange the arugula on the platter and place the salad on top.
-Serve immediately and enjoy!

-Serves 4 adults

*See my video in quick kitchen tips on how to peel and devein shrimp
**You can buy roasted red peppers but I like to roast my own.  Preheat the oven to 425 degrees.  Cut the pepper in half, seeds and stems removed and place on a baking sheet, skin side up.   Roast for 25 minutes.  Remove from the oven and place the peppers in a medium sized bowl.  Cover with aluminum foil for 10-15 minutes.  The skin will peel right off and then you just need to chop when they are cool enough to handle.  I like to do more than one at once and they can keep in the fridge for about one week.  They are great on sandwiches or in dips.  You can also char them on the grill or stove top if you have a gas range.

Related Posts Plugin for WordPress, Blogger...